
Microsoft Graph API in SharePoint SPFX enables us to fetch the data from O365. To connect with the data of millions of people in the Microsoft cloud, use the Microsoft Graph API. Build apps for businesses and people that connect to a plethora of data, relationships, and knowledge via a single endpoint using Microsoft Graph.
Step 1: Create a SharePoint SPFX Project using NoJavaScript Framework.
Open command Prompt (cmd) and Go to the directory where you want to create a project.
Create a new folder: – md MSGraphAPIDemo
Go to that folder: – cd MSGraphAPIDemo
Step 2: Create a new solution with Yeoman utility generator command.
You may easily create a SharePoint client-side solution project with the appropriate toolchain and project structure using the SharePoint Online SPFx Yeoman Generator.
yo @microsoft/sharepoint
Step 3: Once the above command has been successfully executed, provide the below answer to create new SharePoint solution.
Let’s create a new SharePoint solution.
? What is your solution name? ms-graph-api-demo
? Which type of client-side component to create? WebPart
Add new Web part to solution ms-graph-api-demo.
? What is your Web part name? MSGraphAPIWebPart
? Which template would you like to use? No framework
Note: To accept the default values, press the Enter key.
After giving all the required all values, NPM install will run.
It will take a while for Npm to obtain all of the dependencies needed for the project.
Below diagram shows so far what we have done.
After npm install, you’ll get the congratulation message.
Step 4:
The command listed below must be used to install the types for the Microsoft Graph. Use the same solution to execute this command.
Command: –
npm install @microsoft/microsoft-graph-types –save-dev
To open the project in VS code enter: code .
Step 5:
The file structure in the VS code will look like this. We will mainly work on MsGraphApiWebPartWebPart.ts
Step 6:
Open the MsGraphApiWebPartWebPart.ts file
Import the respective modules for the MS Graph API. To import, Add the below line of code in your file
import {MSGraphClient} from ‘@microsoft/sp-http’
import * as MicrosoftGraph from ‘@microsoft/microsoft-graph-types’
Remove all things from the render method and keep only the div tag.
add below line of code.
public render(): void {
this.context.msGraphClientFactory
.getClient()
.then((msgraphclient: MSGraphClient): void => {
// To fetch the current user info from the Microsoft Graph api
msgraphclient
.api(“/me”)
.get((error, user: MicrosoftGraph.User, rawResponse?: any) => {
// To handle the response
console.log(JSON.stringify(user));
this.domElement.innerHTML = `
<div>
<p>Display Name:${user.displayName} </p>
<p>Given Name:${user.givenName} </p>
<p>Surname Name:${user.surname} </p>
<p>Email ID:${user.mail} </p>
<p>Mobile Phone:${user.mobilePhone} </p>
</div>`;
});
});
}
Step7:
Set the Graph API permissions. Go to the config folder.
Open the Package-solution.json file and add below line of code:
“webApiPermissionRequests”: [
{
“resource”: “Microsoft Graph”,
“scope”: “User.ReadBasic.All”
}
],
Step 8:
Before deploying a web part in the app catalogue, ensure that the code is error-free.
Then, open the terminal and run the following command.
gulp bundle –ship
gulp package-solution –ship
After running both the above commands, one SharePoint folder will be created, and this folder contains .sppkg file.
Step 9:
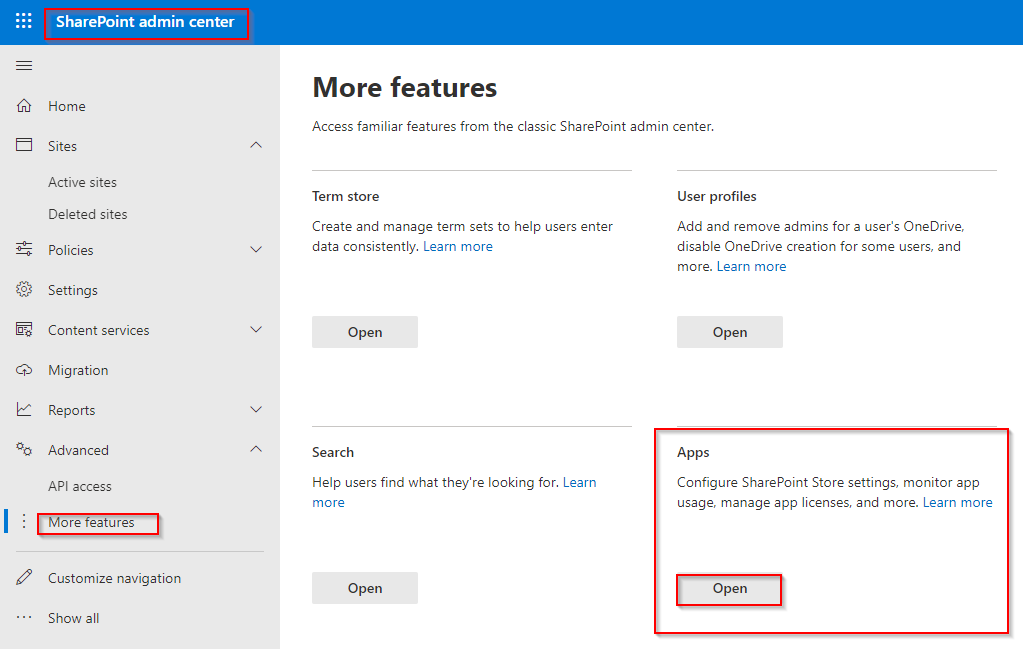
Go to the SharePoint Admin Center -> Click on the more features -> click “Open” in the Apps section.
Click on upload. Go to the project location ->SharePoint folder -> solution folder -> Select the .sppkg file.
Maintain the default settings -> select Enable app
Go to the API access page
Click on Pending requests->Organization-wide->select the request-> Click to approve
The below dialogue will open after clicking on the approve button. Click “Approve” once again.
Step 10:
Your web part is now available to use. Go back to SharePoint Online.
Select your SharePoint site and Click edit.
Then Click “add a new web part” (+) icon. Select the web part by clicking on its name.
As you can see below, we were able to successfully retrieve user information using the GraphApi.
Please follow the below link to explore the MSGraphAPI
Graph Explorer | Try Microsoft Graph APIs – Microsoft Graph
The complete code can be found below.


Leave A Comment