Welcome to the second part of our multi-part series on using Content Automation in AEM as a Cloud Service to enhance your Creative operations. If you missed the first blog of this series, which provides an overview of this feature by Adobe and explores relevant use cases, we recommend checking it out. In this article, we will take a closer look at the creative operations in Adobe Lightroom and how they can be replicated in AEM as a Cloud Service.
The Process in Adobe Lightroom
Let’s begin with a simple example of what is typically done in an Adobe Creative application such as Lightroom. In this case, a processing profile will be created that renders a black and white image and saves it as a rendition with the main image. But first, let’s review a typical scenario in Lightroom:
A main image is created and selected from a photo shoot
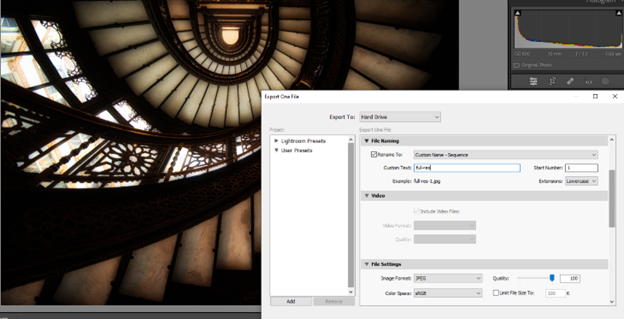
The image is exported with various settings, such as 100% quality:
A request is made to convert the image to black and white, at 50% quality
The black and white image is created in Lightroom using a preset
The black and white image is then exported at 50% quality:
Both images are uploaded to AEM Assets, in their respective folders
With Content Automation you can set up the following steps to perform the processing in AEM:
The Lightroom filter is exported from Lightroom and saved in “XMP” format.
The Filter is then uploaded to a folder in AEM Assets:
A processing profile is created in AEM:
a) Create a new processing profile:
b) Add a Creative processing section
c) Select the Lightroom Filter uploaded from Step #2, along with 50% quality, and an optional target folder for a standalone file:
d) Save the processing profile
e) Apply the profile to a folder so that images uploaded there will run the processing profile:
Once the processing profile is created, it will be executed via microservices after an image is uploaded to the assigned folder. This will create an additional rendition, and optionally create an image based on the processing profile.
In the Card view, the folder will show the processing profile applied:
Upload a main image to the folder, and note the additional rendition created from the processing profile:
After setting up the processing profile, any images uploaded to the folder will automatically generate the additional black and white rendition, eliminating the need for manual processing in Lightroom.
For reference, there are several more processing profiles available with Content Automation, detailed below:
Creative Action
Description
Apply Photoshop Actions
Actions in Photoshop can be saved, similar to a script, and applied to one or more PSD files
Image Cutout
AI can be used to remove parts of the image such as backgrounds
Image Mask
Masking can apply settings to parts of an image, such as blurring the background, or brightening the subject
Replace Photoshop Smart Object
A smart object can be replaced within a PSD file while retaining effects and adjustments
Apply Lightroom Preset
As in the example above, one or more filter presets in Lightroom can be applied to an image, in addition to 50 default presets
Auto Straighten
AI can be used to auto-straighten an image, such as level horizons or vertical buildings
Auto Tone
AI can be used to analyze the image and make a number of light and color adjustments
Wrap Up and Further Reading
In addition to Content Automation, Adobe has several offerings integration options between AEM as a Cloud Service Assets and Creative Cloud applications. See their best practices documentation to explore some of the use cases.
There are numerous ways to configure microservices to process assets, such as creating custom FPO renditions, changing file format, and calling 3rd-party systems to update data for a PIM system. Additional configurations and settings are described in detail on Adobe’s documentation site.
We hope this deep dive into Content Automation has improved your understanding of its capabilities and how it can be leveraged to benefit your organization. Be on the lookout for a third article that will provide a detailed example using Adobe Photoshop Actions. Thank you for reading!
For a live walkthrough of the process, see our video:


Leave A Comment