Site Studio is a Drupal product from Acquia which builds a low-code and component-based website with a simple drag-and-drop interface.
So, what is a component? Components are the mini templates to provide a flexible layout system to customize each section on the page as per requirements. This can be used by site builders in pages to create component-based layouts.
Components can also be used by site builders in templates to take a component-based approach to create websites. This is a reusable object it can be used multiple times with different content on the pages. We can easily be dragged and dropped to these site studio components to create pages on websites.
So, let us see how to create a component step-by-Step in the site studio –
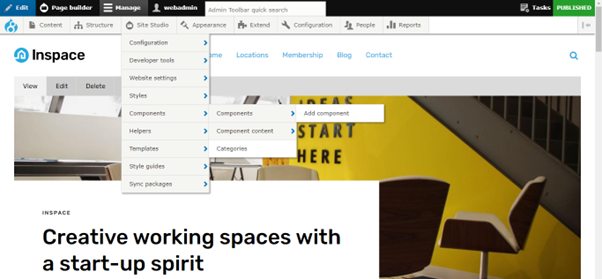
Step 1 – First, navigate to the Site studio menu from the admin menu, Site Studio -> Components -> Components –> and click on Add components.
Step 2 – Then, we need to fill in the details of our components. Add Component Title, choose a category to which category it belongs to, and add Preview image, which is a thumbnail in the sidebar browser.
Tip: There are some component naming conventions we need to take into consideration
Use camel case to write component names to keep consistency.
It is not necessary to include “component” in the name.
Step 3 – Next, we have the layout canvas, layout canvas is a drag-and-drop interface for structuring layouts. Here we build our layout of the component by using the Elements.
Site Studio provides diverse types of drag-and-drop elements which are:
Content elements
Layout elements
Media elements
Interactive elements
View elements
Menu elements
Drupal core elements
For more information about using these Elements, you can refer to this Document
Now, click on the “+ plus” button and drag and drop the elements according to your component.
First, drag the Layout elements inside it.
Step 4 – Now comes the styling part, by using the style tab, you can give stylings to your component. Double-click on the element and you can see all the settings.
In the properties tab, you can get all the CSS styles as well as we have the option of custom CSS.
Tip: Better to use a full-width container first and a boxed-width container to center rather than using any CSS stylings to center the component.
Step 5 – Next, we need to add the actual content element. Add the elements from the sidebar browser according to your component, here also you can add the styling from the properties tab by double-clicking on the elements.
Step 6 – Now, create the component form, and preview your component form in the Component form preview area to see how the form has been created. And save it as a component by simply clicking “Save and continue.”
For more information about the component form builder, you can check my upcoming blog on the Component form builder.
Step 7 – Add your component to a page that has a Layout canvas. Now, drag and drop it into the layout and double-click on the Component to edit its settings and add the content inside it. And lastly, Save and Preview your page.
And now your Site Studio component is ready.
Thanks for reading!


Leave A Comment